Knitwit – The Press, November 25th 2009
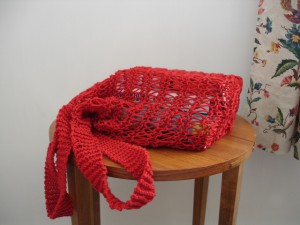
 I’m not too keen on those bright advertisements shops are encouraging us to carry to and from the supermarket, although I do agree with cutting back on plastic bags. So I decided to make myself a bag I can keep in my carryall, something small but expandable.
Simply put, a string bag consists of holes surrounded by string – but there are lots of ways to surround those holes.
I have tested different yarns and methods and found many suitable. Cotton twine, knitting cotton and a cotton/bamboo mixture are good. Macrame twine works well, but I found it quite harsh to knit and it makes for a heavier bag.
A bag can be knitted on two, four or circular needles. When using two needles the easiest method is to start from the top and knit down. I have formulated a simple bag recipe. Using this method you can knit a bag of any size or shape you decide.
To make a medium sized string bag, cast on 80 stitches on size 6.5 or 7mm knitting needles. The fatter the needle the bigger the holes in the bag. If the holes are too large you could lose things, so experiment with different sized needles. Knit up a swatch to check your gauge, it will give you a feel for the fabric and an idea as to how many stitches you will require for the size of the bag you want to knit.
Begin the bag from the top with at least four rows of either garter stitch or moss stitch. This gives strength to the edging and a place to stitch handles onto.
Through experimentation, I have found the easiest stitch pattern for the body of the bag is a Mock Turkish stitch.
This recipe gives ease in that you use just two needles and the knit stitch at the beginning and end of each row makes it easier than when starting a row with a YON (yarn over needle) and gives a uniform edge to stitch up later.
K1, *(YON, K2tog,)* K1 repeat from * to end of row.
Repeat this row for the length required, say 30-40cm. Do not make the body too long as the fabric stretches and no one wants a bag that drags.
When you have knitted the body of the bag to the length you require, it is time to knit the base.
For the base of the bag:
Row 1: *(K2tog)* repeat to end of row. You will now have 40st on your needles.
Rows 2~5: K
Row 6: *(K2tog)* repeat to end of row. You will now have 20st on your needles.
Rows 7~10: K
Row 11: *(K2tog)* repeat to end of row. You will now have 10st on your needles.
Row 12: K
Row 13: Take the long tail of yarn still attached to your knitting and, using a darning needle, thread the yarn, then run a thread through all stitch loops to form a circle and bind off. Leave the thread long to join the bag together by stitching through all the stitch ‘pips’ at the edge of each row.
Handles: There are many ways to create handles… here’s an idea of one.
Cast on 20 stitches, K 6 rows the divide for two separate handles.
Row 7: K7, cast off 6st, K7
Row 8: K7, join up separate yarn to second handle and K 7
At this stage you can knit each handle separately or join a separate yarn to the second handle and knit both at the same time on the same needles. This will ensure both handles are the same length.
Continue knitting until the handles are the length required. Stretch them slightly when making the decision on length as they will stretch when the bag is in use. 20~ 30 cm is a useful guide for length.
K7, cast on 6 st, K7
Knit five more rows then cast off.
Stitch the handles evenly to the band at the top of the bag.
Remember – my instructions are merely a guide for you to bounce your own ideas off. If you can graft, then pick up 20 stitches on each side of the bag, knit the handles to your required length and graft the handles together. It makes for a neat join and saves having to stitch the handles on separately. If you wish you can knit from the bottom up, or use circular needles.
Even though Christmas is just around the corner, there is still time for a few small knitting projects, so play with the above suggestions and tap into your own creative spirit to design unique, useful gifts for family and friends.