#2 – Me likey

I found a wonderful second-hand 1940s knitting pattern book, a get well present for my mother, the obsessive knitter, after a hard and debilitating illness. I know she loves old knitting recipes, especially ones from the 1940s, and the book delivered handsomely. Too handsomely.

Within these soon-to-be-coveted pages I found the best looking t-shirt I have seen in a long, long time. Knitted! Texture! Simplicity of shape! The open, generous neckline. Sleeves to the elbow, just so. Very Margaret Howell in the honesty of silhouette, perfectly embodying the ethos of workmen’s clothing of yore. I was hooked. I wanted.

Did it seem mean-spirited to send a get well book to a recuperating mother with a note inside reading ‘I really, REALLY like the pattern on pages xx. Please knit me.’? Probably. Was it selfish? Most likely. Do I really, really want that t-shirt? You betcha.

BDW

#1 – Clarification

Knitting is a strange and intriguing pastime that, it seems to me, centres around clarity.

Clarity of the mind (knitting is an amazingly peaceful and restorative pastime). Clarity of one’s intentions (do I wish to finish this project with a hat or a scarf?). The clarity gained from following a recipe (pattern to you uninitiated knitting fiends), either your own or someone else’s, from A to Z without skipping a stitch. Clarity of one’s thoughts, in other words.

The act of knitting also clarifies one’s creativity. Not only what you want to end up with, but how did you come to this? How will you get there? What will your reaction be, or that of the intended recipient, to your carefully chosen stitches? Where will this creative journey take you?

The world of the obsessive knitter is rich with exciting possibilities. BDW

Fingerless Gloves

I have a friend whose fingers become cold and achey when using her computer. If she used the computer only now and then this would not be a problem, but she uses it daily for hours, so a solution is required. She could wear gloves but they slip and slide on the keys and cause mistakes in the text. She says it is the wrist and arm area that most needs to be kept warm. Mmmmm, fingerless gloves could be a solution. They are useful in any situation where you want your fingers free while your hands, wrists and arms are snug and warm.

First, choose the look, weight and feel of the yarn for the effect you want. I’ve trialed them in wispy kid silk, laceweight merino, silk and cashmere 2ply, camelhair, baby wool, merino and nylon 4-ply sockwool and 8-ply alpaca and merino. All are suitable, all are lovely in their own way. Each has a different look and feel.

Use fine needles with fine yarn and be guided by the suggestion on the wool band; I say guided because your swatch will have the final say. Take the time to knit a swatch. Count the number of stitches per 10cm square. Measure round your hand just below where the fingers join the palm. This will give you an idea of the measurement of the fabric you will need to knit.

Here’s the simplest pattern possible for a plain fingerless glove using two, four or circular needles – choose the needles you are most comfortable with. You will want to explore different needles, patterns and effects when the basic pattern and technique feels comfortable.

As a guide, for a medium size glove for a hand measuring 18cm around the top of the palm where the fingers begin, and 18 cm long, you will need approximately 125metres of 4-ply yarn. Check on the wool band for the length of yarn in the ball. If you want the glove to go further up the arm then you will require more yarn.

You will need two sets of needles, e.g. 3mm for the ribbing and 4mm for the body of the fabric.

On the finer needles cast on stitches. Rib for 2 cm, change to the thicker needles and knit in stocking stitch for 14 cm. Finish with 2 cm of ribbing on size 3mm needles. Cast off.
Stitch the side seam leaving a 4 cm space for the thumb about 11 cm from the wrist.

MBW

Welcome to my world

As a child, I knitted doll’s dresses for pocket money.  In my teens, in the sixties, I was hip to the beat with self-knitted big ‘Sloppy Joe’ sweaters, worn with tights of off-beat colours and winkle-pickers, followed by years of practical family knitting. But, after years of not casting on due to life getting in the way, I had lost the knack of knitting.

I wasn’t satisfied with the results of my renewed effort,  it was a bit hit and miss…. That is, until I got serious about knitting tension swatches and checking my gauge before beginning the next project.  I used to consider swatches a waste of time and wool.  I’d do them now and then, but didn’t learn how liberating those little bits of stitches could be.  Oh, how foolish I was.

Most pattern books tell you to knit a tension square or swatch and carefully check your gauge before starting the garment. (The tension refers to your  individual knitting style – are you a loose knitter, or a tight knitter? The gauge is a device for checking your tension. The swatch reveals all.)  I used to get part way through a swatch, get bored, check a few lines and rip into the real knitting.  Sticking pins in a wee bit of cloth seemed like too much trouble – close enough was good enough.  I really didn’t get it and it took me years of knitting wearable, but slightly disappointing (for my picky fashion sense) garments, for the penny to drop.  Those jerseys from my teenage years kept raising their sleeves in protest.

The swatches have released the frustration of knitting. Now, when I know what I have in my mind’s eye will work out as I intend it to, and not result in some misshapen dishcloth, I can knit to my heart’s content,  guiltless of time and wool costs.

The swatches have also taken me away from pattern books to designing my own garments.  Now I can play with my knitting, designing on the go, either by pre-drawing my own pattern or making it up as I knit.  Being clear-headed about how big or small something will be, what will happen if I decrease, increase, or change needles midstream, and shaping garments to fit my imagination has unlocked exciting potential.  It has become more playful, more creative and enjoyable.

If you take only one tip from me, it is fall in love with tension swatches and checking your knitting gauge.  Always knit your tension swatch before you start your project.  It will save many a headache later.

To make a useful tool to check your gauge:
Take a piece of cardboard or firm plastic approximately 15X15 cm.
Draw a 10X10cm square central to the above square.  Accuracy is critical for future success. Cut out the 10X10cm square, preferably with a craft knife (It will give a cleaner cut than scissors).

In future when you knit a swatch, cast on at least four stitches extra and knit at least four rows more than recommended.  This will allow for the edge curl that forms on knitting and make it easier for you to count stitches and rows. Let the swatch ’rest’ for at least a couple of hours before you measure it as wool relaxes after knitting.  Sounds weird, but bear with me, it does make a difference.
Now place the tool to check your gauge central to the swatch, stick a pin through the knitting at each corner and start counting. When a garment requires 20 stitches per 10cm, be sure it is 20 stitches, not 19 or 21.  Even half a stitch can make a difference over a large piece of knitted cloth. When 20 stitches equals 10cm, 40 stitches will equal 20cm, and so on.  Now you can make pieces to your own measurements.

When you count the number or rows knitted per 10cm you will know how many rows you will need to knit for the length of the garment.

The number of stitches is crucial to sizing while the number of rows is less so. A row more or less will not be a disaster, you can always knit another row or unravel a row of stiches, but too many or too few stitches will cause you to tear your hair out as you spend frustrating hours knitting and unravelling wool.  Attention to detail early on makes for an enjoyable pastime.

A swatch may be irritating to do, but remember – small irritations can make pearls or lame ducks. Give me pearls any day.

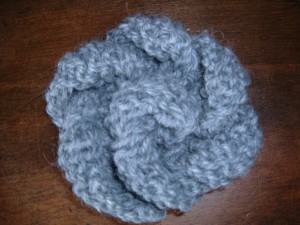
A touch of handmade style:
Flower  pattern:

Cast on  40 stitches.
Knit  10 rows.
Row 11:  *Knit 5, hold the right hand needle still, twist the left hand needle toward you and rotate 360 degrees. Continue from * to the end of the row.
Row 12:    *Purl 2together.  Continue from * to the end of the row.  You will now have 20 stitches on your needles.
Row 13:    *  Knit two together. Continue from * to the end of the row.  You will now have 10 stitches on your needles.
Row 14:     *Purl 2together.  Continue from * to the end of the row.  You will now have 5 stitches on your needles.
Row 15:  Slip first stitch over second then slide first stitch off needle, second over third and slide second stitch off needle, third over fourth and slide third stitch off needle, fourth over fifth, slide fourth stitch off needle then tie off the last stitch by slipping the thread through the loop.  Twist into a flower shape and stitch in place.  Add a brooch pin to the back of the flower.

Now play with the pattern and make it your own.  Design your own flower. If you want to make a smaller, more delicate flower, use fine or embroidery wool (you will find a wide range of wonderful colours available), knitting cotton or silk and smaller needles.  For a larger flower, experiment with big wool and big needles.

Try more stitches, fewer stitches.

Remember that you need to turn your needle to make the petals so when you cast on, decide how many petals you want and cast on multiples of stitches times the number of petals you want your flower to have. In other words if you want seven petals and seven stitches equal a petal you will need 49 stitches; nine petals of seven stitches will need 63 stitches.  You don’t even have to stick with seven stitches per petal, you can make small tight petals (use fewer stitches) or big floppy petals (use more stitches).

When it comes to the cast off stage and you have an uneven number of stitches, just relax, and on one of the decreases, knit or purl three stitches together.

Remember, we want a challenge, some fun and creativity.  Be gentle with yourself, humans need to create so be a little playful.

MBW

A scarf of one’s own – The Press, October 28th 2009

Any time of year, a scarf is a popular accessory. Why don’t you design your own one of a kind summer scarf.

I have a favourite scarf pattern that I use all year round. It’s reversible, keeps it shape well and looks good in many different yarns. For both men and women, it knits up handsomely in wools for winter and bamboo, cotton or silks in summer.

When designing your own, the only rule is there are no rules – this is your own personal design. Think about the colours that remind you of summer: sea, sand, sky, strolling along the beach, summer grasses, picture of the light and shade…

Take a sheet of paper and draw a long rectangle. Using coloured pencils, design your own scarf, placing stripes wherever you want. Draw a number of trials, changing the placement of colours and width of stripes until you feel happy with the effect. How wide do you want it to be, how long?

Take your design with you to a wool shop and ask for assistance. How much yarn in each colour will you need? It’s all about proportions, and the people who work in wool shops field such questions every day and willingly help with suggestions as to types of yarn and colours available and the amount you will require to complete your scarf. Always search for the best yarns you can afford; good materials contribute to good design. If you don’t like the yarn, don’t buy it; you are making an accessory that will take time and will be worn on numerous occasions, so take care in your choices.

If you choose to knit with cottons or silks, remember that they have a tendency to move south and stay there when knitted on larger needles, so use a thinner gauge needle and the fabric will stay where you want it to. Both cotton and silk will behave better if mixed with another yarn. Wool is a good companion as it has a good memory and will help keep the fabric in shape.

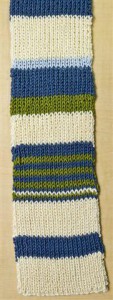
The pictured scarf was knitted using 38 stitches on size 4mm needles in a single rib (knit1, purl 1) stitch pattern. The inspiration was summer with a thirties influence – the geometry of naughty and nice. I used a combination of bamboo, wool and cotton yarns. The cream base colour is a Sirdar Bamboo/wool mix, as is the dark blue. The cottons come from the Rowan range. The double knit green cotton has a gorgeous acid lime look, while the pale blue is a more delicate 4 ply.

When mixing yarns produced by different manufacturers you may find that even though they are labelled the same ply they may actually be of differing widths, so you may have to change needles to maintain the tension. This applies also to mixing plys. I could have doubled the 4 ply yarn but chose not to. Just go for the effect you want to create. Your stripes might be one, two, ten or more rows, repeating patterns or random stripes, it’s all up to you.

In general, when joining your yarn, do so at the end of a row and knot it as close to the edge as possible to retain tension, then continue knitting. If the colour change is just for a row or two you can trammel the yarn up the side of the scarf by wrapping the two yarns together, thus avoiding a join. However, remember, there are no rules, only recommendations. This is your own design and you can join your yarn in the middle of a row if that is the effect you want to create (just make sure you tie a knot that will not come loose with wear or your scarf will unravel).

When you have completed your knitting to the length of your choice, return to those knots, undo them and, using a sewing needle, stitch the threads together and run them along the fabric edge of the scarf.

I got a bit carried away with the stripes, using all widths from single rows to wide blocks of twelve or more rows of colour and enjoyed knitting my way to producing a scarf about two metres in length.

MBW

Breeze beaters – The Press, September 30th 2009

In the story of knitting, written patterns or recipes as they were originally called, came rather late to the game. Until around 1835 people composed their own recipes and handed them on by word of mouth. Measurements were taken, sizes were calculated, either by percentages or by linear measurement, and garments knitted. Most knitting was not shaped as we expect these days, so things were simpler. If a garment turned out of a size not suitable for its original purpose, then there was always someone in the family it could fit. We don’t have as many children as our ancestors, and good yarn is not cheap, so we have to be a bit more careful to ensure it does not end up on the never to be worn pile.

Today, there are knitting styles and patterns aplenty available in shops and on the internet, but they are still someone else’s recipes. While there is nothing wrong with using other’s recipes, this is intended to draw you in to creating your own, freeing you from the need to use other people’s ideas, allowing your own creative spirit to tip toe out of the shadows and show what it can do. Knitting is essentially made up of just two stitches… plain and purl. Master these two movements and you are at the beginning of a lifelong adventure in fabric. Release yourself from the need to use other’s recipes, then like a creative foodie, you can invent your own, suited to your own taste and style.

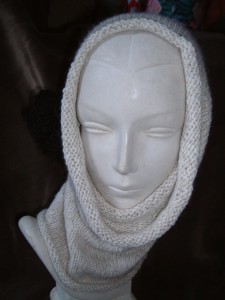
Outside the winds are still chilly even though the sun shines and the calendar says Spring. At the change of seasons, it is so easy to catch a chill when caught unawares by fickle weather. Too warm for big scarves, too chilly to go without. I carry a cowl in my bag, just in case there’s a change in the weather.

Full Head Cowl in 8 ply

Whether you want to knit a cowl in soft, big wool using big needles or a dreamy, lacey, full head or shoulder cover in fine yarn, remember to knit a swatch before you begin. Why bother? Because, as well as finding out how many stiches you will need, you will find out how the fabric feels, looks and behaves, whether it will have the ‘look’ you want to achieve. Choose your yarn to suit the look and feel you want to achieve and the colour tosuit your taste. Select the stitch you like, be it stocking stitch, rib, cable or a feathery look. Knit a piece of fabric large enough to get a real feel for what you want. It is better to spend some time before you begin your project to ensure you get the results you want. Remember, the swatch reveals all.

One size does not fit all, measure the area you want to cover. If you want a cowl that fits snuggly round your neck, make sure to measure around your head, above your eyes so you will be able to get it over your head without a struggle. If you want a loosely fitting cowl, measure your head and add extra cm for ease. If you want to make a flat piece that will wrap around the shoulder area, measure around your shoulders, add a few extra cm so you can cross it over to hold it together with either a brooch or a pin.

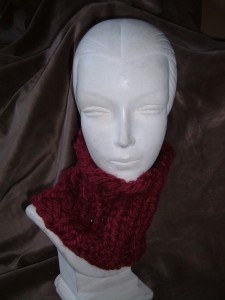
Big Wool Cowl

This is a guidance, not the only way to create a cowl.
The cowl in the picture is knitted in big wool, approximately 14 ply on size 12 needles, using a double rib pattern. Double rib is a four stitch pattern.
Cast on 32 stitches.
Row 1: *Knit 2, Purl 2, continue from * to end of the row
Row 2: *Knit 2, Purl 2, continue from * to end of the row
These two rows form the pattern, so knit as many rows as you want to make your cowl. The cowl in the photo is fifteen rows and required approximately 50 metres of big wool. Stitch the ends together to complete. Pop it on and admire your handiwork.

Because I wanted to join the knitting to make a continuous pattern I used 32 stitches.
If I wanted to make a neck wrap that is not joined, but held together with a brooch or flower pin, I would add two extra stitches so that the edges would both look the same from each side.

When knitting a shoulder wrap, take your measurement, calculate the number of stitches you will require using the 10cm square guage of your swatch, double check your measurements, and knit.

Knitting is not for pussies, it takes time and perseverance to complete a garment, so hang in there, be patient with yourself, swatch swatch swatch, then design, decide, and create your own personal masterpiece.

Knitting is fast becoming the new yoga, a slow craft, a form of relaxation that allows your creative soul to expand.

Knitting is not fast food, it takes time to choose your yarn, design and create, it is slow food for the soul.

Simple guides that you can tart up to your heart’s content.

MBW

A head for knits – The Press, March 10th 2010

I’ve been playing round with hats lately.
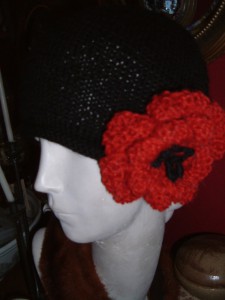
A simple cloche or beanie can be knitted on two, four or five double pointed needles or on circular needles, whichever you feel happiest using. The shape is basically a tube tied off at one end, and if you have knitted a bag you can knit a hat.

When you know how, you can produce your own hat recipe for any sized head so choose a yarn you like and needles to match the ply.

Next, swatch your yarn. The number of stitches per 10cm will give you the basis to decide how many stitches you will need to cast on for your hat. If your swatch shows 20 stitches to 10cm then you have 2 stitches per cm. Measure the circumference of the head just above the eyebrows. If the head circumference is 55 cm then do the maths ( 55 x 2 = 110) and cast on 110 stitches.

Sometimes when doing the measurements things can get a bit tricky. Fear not. Tend towards less rather than more stitches at this juncture because if the hat is too large and you disappear inside it you may have to rip the finished product off the needles and start again, while if too small it will tend to stretch, especially if knitted in wool.

Here’s a basic recipe for a medium sized adult hat using approximately 150m of 8 ply woollen yarn.

The pattern below is a guide only, personalize it and make it your own.

On 3mm needles cast on 100 stitches, knit in stocking stitch for 10 rows or, if you want a more substantial rolled edge, cast on using 4mm needles and knit more rows for the edging. If using two needles, you will need to knit one row and purl the next to produce stocking stitch. If using a circular needle, just knit every row. When you knit stocking stitch you will produce a rolled edge and on thinner needles this will give a better grip on the head. If you prefer, you can begin with ribbing for an alternative edging.

When using a circular needle, choose a shorter length than the circumference required because a longer length will tend to produce a misshapen hat.

After the 10 rows, change to 4mm needles and continue for approximately 15 cm dependent on the size of the head. I have found that by measuring the length of the hand from wrist to the tips of the fingers of the person the hat is for you get a fair indication of the approximate number of cm you will require for the head height.

When you have reached the hat height you want, it’s time to decrease. You might decrease by 10% for a basic hat. If you want a flattened top be more aggressive in your decreasing, eg on odd rows *k2tog, repeat from * to the end of the row, and on even rows, purl. If you want a peak to your hat spread your decreases over twice the number of rows, decreasing every 4th row rather than every second row. This way you can shape your hat to your own liking.

To make life easier when decreasing, place a stitch marker after every tenth stitch then knit 2tog before each stitch marker. When you have 10 stitches remaining, thread the yarn tail through a darning needle and pass it carefully through each stitch, draw the thread up tightly and tie off then if you have knitted the hat on two needles, stitch the hat seam.

Below is a method to decrease when you have 100 stitches on two needles.

Row 1: *k8, k2tog, repeat from * to end of the row

Row 2 and each even numbered row: Purl

Row 3: *k7, k2tog, repeat from * to end of the row

Row 5: *k6, k2tog, repeat from * to end of the row

Row 7: *k5, k2tog, repeat from * to end of the row

Row 9: *k4, k2tog, repeat from * to end of the row

Row 11: *k3, k2tog, repeat from * to end of the row

Row 13: *k2, k2tog, repeat from * to end of the row

Row 15: *k1, k2tog, repeat from * to end of the row

Purl one last row and thread the tail of the yarn through all stitches, being careful not to miss any and tie off, then use this long tail to stitch the hat seam.

Voila, you have produced a hat. Now, why not design one with cables or some other stitch pattern, even Fair Isle, the basics are still the same. Play a little until you get the effect you desire.

If you want the crochet look but cannot crochet try the stitch pattern below.

Cast on multiples of 2 +1

Rows 1,2,3: Purl

Row 4: K1, * yon, slip 1, knit 1, psso, repeat from * to end of row

Rows 5,6,7: Purl

Row 8: K1, *yon, K2tog, repeat from * to end of row
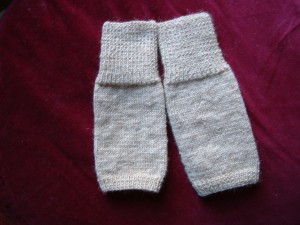
Dish Cloth Duty – The Press, December 16th 2009

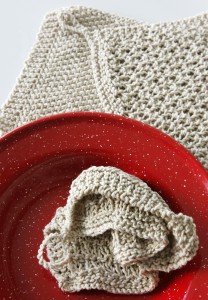
With just a few days left before Christmas there is time still to create some last minute hand made gifts. People will appreciate the time and effort you spent making it. In an evening you can knit a cloth that can be used to wash those dirty dishes, or by using more refined yarn, a dirty face.

The most suitable yarn is cotton; approximately 50metres of either 4 ply or 8 ply (double knitting). Pure cotton is best as it draws up water well. Acrylics and manmade fabrics are not suitable for this project. You might use cotton twine or knitting cotton for a dishcloth, and knitting cotton, bamboo, or a luxurious cotton and silk mixture for a facecloth.

You can make your cloth in any size you choose – remember, this is your design. Below is a basic pattern to give you some ideas to launch your own creativity.

Basic pattern:
Cast on 36 stitches on size 4mm needles.
Knit 4 rows.
Row 5 ~ 36 (or required size): K3, K central area pattern: eg Moss stitch, K3
Knit 4 rows, cast off.
You might change the size of needle, the type of yarn and the number of stitches. Remember, your swatch will be your guide.

Some patterns you might use for the central area of the cloth are:
Moss stitch, Waffle Stitch and Trinity stitch, in order of complexity.

Moss stitch is a two stitch pattern of K1, P1. Repeat this pattern for each subsequent row.

Waffle stitch is formed from multiples of three stitches and four rows.
Row 1: *K2, P1* repeat from * to the end of the row.
Row 2: *P2, K1* repeat from * to the end of the row.
Row 3: *K2, P1* repeat from * to the end of the row.
Row 4: K

Trinity stitch is formed from multiples of four stitches and four rows. Cast on 38 stitches for this pattern, as the central area requires 32 stitches (8 sets of a 4 stitch pattern), plus 3 stitches for each side edging. When you have knitted the central piece to the shape you require, it is best to end on row three of the pattern and knit the 4th row instead of purl and make it part of the edging. This balances out the ‘look’ of the pattern.
Row 1: * (K1,P1,K1) into the first stitch, P3tog)* repeat from * to the end of the row.
Row 2: P
Row 3: *P3 tog, (K1,P1,K1) into the next stitch* repeat from * to the end of the row.
Row 4: P
Trinity is so called because you make three stitches from one stitch then make one stitch from three stitches.

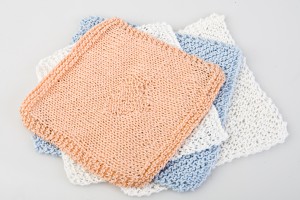
Another possibility is to knit an entire cloth in stocking stitch (knit one row, purl the next row) of any shape you want, or to add a picture or shape in the central area.

Maybe you could knit every row on the diagonal, starting with three stitches, adding one stitch at the beginning of each row until you reach the centre then decreasing one stitch at the beginning of each row until only three stitches remain and bind off.

Use a smoother stitch for a face cloth and a more complex stitch for a body cloth or pot scrubber. Knit a cloth, add a luxurious scented soap and, voila, you have a gift for that surprise guest.

Now it is your turn to play with the above suggestions, add your own ideas and tap into your own creative spirit to design unique, useful gifts for family and friends.

Knitwit – The Press, November 25th 2009

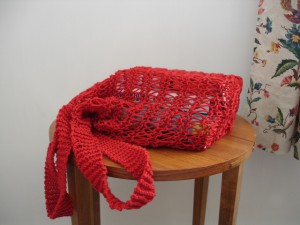
I’m not too keen on those bright advertisements shops are encouraging us to carry to and from the supermarket, although I do agree with cutting back on plastic bags. So I decided to make myself a bag I can keep in my carryall, something small but expandable.

Simply put, a string bag consists of holes surrounded by string – but there are lots of ways to surround those holes.

I have tested different yarns and methods and found many suitable. Cotton twine, knitting cotton and a cotton/bamboo mixture are good. Macrame twine works well, but I found it quite harsh to knit and it makes for a heavier bag.

A bag can be knitted on two, four or circular needles. When using two needles the easiest method is to start from the top and knit down. I have formulated a simple bag recipe. Using this method you can knit a bag of any size or shape you decide.

To make a medium sized string bag, cast on 80 stitches on size 6.5 or 7mm knitting needles. The fatter the needle the bigger the holes in the bag. If the holes are too large you could lose things, so experiment with different sized needles. Knit up a swatch to check your gauge, it will give you a feel for the fabric and an idea as to how many stitches you will require for the size of the bag you want to knit.

Begin the bag from the top with at least four rows of either garter stitch or moss stitch. This gives strength to the edging and a place to stitch handles onto.

Through experimentation, I have found the easiest stitch pattern for the body of the bag is a Mock Turkish stitch.

This recipe gives ease in that you use just two needles and the knit stitch at the beginning and end of each row makes it easier than when starting a row with a YON (yarn over needle) and gives a uniform edge to stitch up later.

K1, *(YON, K2tog,)* K1 repeat from * to end of row.
Repeat this row for the length required, say 30-40cm. Do not make the body too long as the fabric stretches and no one wants a bag that drags.
When you have knitted the body of the bag to the length you require, it is time to knit the base.
For the base of the bag:
Row 1: *(K2tog)* repeat to end of row. You will now have 40st on your needles.
Rows 2~5: K
Row 6: *(K2tog)* repeat to end of row. You will now have 20st on your needles.
Rows 7~10: K
Row 11: *(K2tog)* repeat to end of row. You will now have 10st on your needles.
Row 12: K
Row 13: Take the long tail of yarn still attached to your knitting and, using a darning needle, thread the yarn, then run a thread through all stitch loops to form a circle and bind off. Leave the thread long to join the bag together by stitching through all the stitch ‘pips’ at the edge of each row.

Handles: There are many ways to create handles… here’s an idea of one.
Cast on 20 stitches, K 6 rows the divide for two separate handles.
Row 7: K7, cast off 6st, K7
Row 8: K7, join up separate yarn to second handle and K 7
At this stage you can knit each handle separately or join a separate yarn to the second handle and knit both at the same time on the same needles. This will ensure both handles are the same length.
Continue knitting until the handles are the length required. Stretch them slightly when making the decision on length as they will stretch when the bag is in use. 20~ 30 cm is a useful guide for length.
K7, cast on 6 st, K7
Knit five more rows then cast off.
Stitch the handles evenly to the band at the top of the bag.

Remember – my instructions are merely a guide for you to bounce your own ideas off. If you can graft, then pick up 20 stitches on each side of the bag, knit the handles to your required length and graft the handles together. It makes for a neat join and saves having to stitch the handles on separately. If you wish you can knit from the bottom up, or use circular needles.

Even though Christmas is just around the corner, there is still time for a few small knitting projects, so play with the above suggestions and tap into your own creative spirit to design unique, useful gifts for family and friends.

Wash, Baby, Wash – The Press, February 3rd 2010

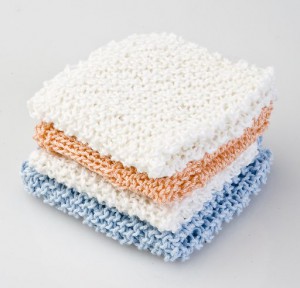
Baby Wash ClothsLately, it seems, everyone is having a baby or knows someone who is having a baby.

When designing garments for little ones, consider the look, feel and the drape of the fabric: a baby’s skin is delicate so a soft 2, 3 or 4ply cotton is suitable for a facecloth, although not all cotton yarn is suited to such tender skin, so choose one that is soft to the touch and 100% cotton for good water absorption. Yarn from different manufacturers behaves in different ways and even yarns of the same ply vary, so it is important that you swatch before your knit your final piece to ensure success.

The useful wash cloth can morph into an equally useful face cloth for a new born or, if you are feeling adventurous, into a baby shawl or blanket.

Stocking stitch is flat and gentle on one side and nubbly on the other for those grubby little baby bodies.
As a guide for 4ply, cast on 36 stitches using size 4mm needles. Some stitch patterns will require more or fewer stitches so play with designs until you get the effect that pleases you.
Knit 4 rows to make the edgeof the cloth then on odd numbered rows: K3, K 30 stitches for the central area pattern, K3 and on even numbered rows: K3, P 30 stitches for the central area pattern, K3.

Repeat these two rows until you have the shape you require…eg a square. The size of the square will depend on your row count according to your swatch.

Knit 4 rows for the edging and cast off.

Use this as a basic outline and add your own ideas and stitch patterns. Decide the size and shape of the fabric you want to knit. You might want to change the size of needle, the type of yarn and the number of stitches.

If you want to add a picture to the central area, first draw it onto graph paper and follow the squares as for cross stitch, one square to one stitch

Moss stitch is also suitable especially with a lovely soft 2 ply yarn
Moss stitch is a two stitch plus 1 pattern of K1, P1, so cast on 37 stitches for the central area plus the border. Repeat this pattern for each subsequent row and finish the central area on a wrong side row to ensure the pattern looks well as you complete the cloth with the border.

Another method to complete a facecloth is to knit from corner to corner on the diagonal. The shape of the square is increased from three stitches to 46 then decreased to three stitches.

So…Cast on three stitches and knit one row.

Next Row : Knit 1, make1 by picking up and twisting the horizontal thread between stitch 1 and 2 and knitting this as a stitch, knit to the end of the row. You will now have 4 stitches on your needle.

Next row: Knit1, make1 picking up and twisting the horizontal thread between stitch 1 and 2 and knitting this as a stitch, knit to the end of the row. You will now have 5 stitches on your needle.

Continue in this manner until you have 46 stitches on your needle. The shape of your fabric will now be a triangle. Now it is time to start decreasing stitches by knitting the first stitch in the row, knitting the next two stitches together then knitting to the end of the row. This will decrease the stitches by one on each row. Continue decreasing at the beginning of each row in this manner. When just three stitches remain on your needle it is time to cast off and tie in the ends. Your cloth will be a square at this stage. Cloth knitted on the diagonal retains its shape well.

Why Not Knit a Pile of Face Cloths?If you have already knitted a pile of face cloths for the little one why not take these basic ideas and extend your fabric to make a shawl or a blanket. More stiches on your needles will give you a larger fabric, so knit as many as it takes according to the size you want and the swatch you prepare. Knit shapes that you can later stitch or crochet together or one large piece of fabric in soft cotton yarn, bamboo, merino, silk, or oh so luxurious cashmere. Imagine soft fabric, delightful colours, shapes and patterns. Your imagination, creative spirit and perseverance is all it takes as the process of knitting allows you to become more confident with each project. From little acorns oak trees grow.

« Previous Page
All content copyright Min Whyman | All rights reserved.